So you don’t want Visual Studio to be installed in a Virtual Machine, because that’s not what happens in the real-world.
You want Visual Studio to be natively on your Windows 8, but easily copy files for deployment to IIS/SharePoint site hosted by your 3-tier virtual machines of Web-App-Database servers.
You want to be able to use the Domain Controller’s DNS in the virtual machine, so you can type http://intranet.zed.com from Windows 8 Internet Explorer, not from Restricted IE inside your virtual machine.
You want to simulate having 2 Datacenters, where 2 virtual machines have different Subnet, and they all communicate through a Software Router.
Even better, the Software Router connects to your Windows 8 Internet so all the virtual machines can get Internet access via the router without configuring 2 network cards.
This post will be a long one, with a lot of screenshots, but it’s a necessary one.
This was supposed to be posted last year, but since I promised in my recent presentation at SharePoint Saturday Abu Dhabi that I will share the PowerShell snippets to automate creating the Virtual Machines, I have a non-lazy reason to finally post this 🙂
Part 0: The IP Table
This is the table that I used for my SQL Server Disaster Recovery talk. I have 2 datacenters and simulating what happens when servers in one country go down.
| VM | Virtual Switch | IP | Gateway | DNS |
| DC1 | Datacenter1 | 172.16.1.2 | 172.16.1.1 | 127.0.0.1 |
| ROUTER1 | Datacenter1
Datacenter2 GuestToLoopback |
172.16.1.1
192.168.1.1 192.168.2.1 |
172.16.1.2
172.16.1.2 172.16.1.2 |
|
| SQL1 | Datacenter1 | 172.16.1.10 | 172.16.1.1 | 172.16.1.2 |
| SQL2 | Datacenter2 | 192.168.1.10 | 192.168.1.1 | 172.16.1.2 |
| SP1 | Datacenter1 | 172.16.1.20 | 172.16.1.1 | 172.16.1.2 |
| SP2 | Datacenter2 | 192.168.1.20 | 192.168.1.1 | 172.16.1.2 |
Part 1: Configure Network and Virtual Datacenters
Run this PowerShell script to create 2 private switches:
|
1 2 3 4 5 6 7 |
# ZeddyLabs.com - Create2DatacentersVSwitch.ps1 # Create 2 Virtual Switches as Private to simulate 2 Datacenters # 172.16.1.x for Abu Dhabi # 192.168.1.x for Singapore Import-Module Hyper-V New-VMSwitch -Name "Datacenter1 on 172.16.x.x" -SwitchType Private New-VMSwitch -Name "Datacenter2 on 192.168.x.x" -SwitchType Private |
Loopback Adapter
The Loopback Adapter will allow our host Windows 8 to browse the IIS/SharePoint hosted in the virtual machines. It will also query the DNS of the Domain Controller hosted in the VM.
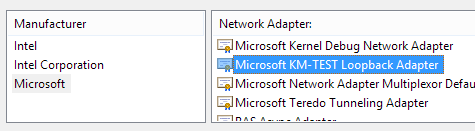
Go to Control Panel > Device Manager. Right-click your computer name (the first top node under device manager) and select Add Legacy Hardware.
Choose Advanced, Manually select from list (Advanced), scroll down to choose Network Adapters then click Next.
Choose Microsoft from Manufacturer, Loopback from the right:
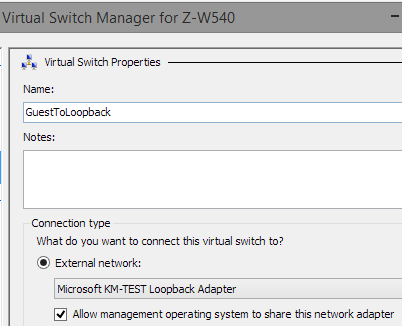
Go to Hyper-V Manager and open Virtual Switch Manager. Create a new External Virtual Switch and name it GuestToLoopback, configuring it to the physical Loopback adapter as shown below.
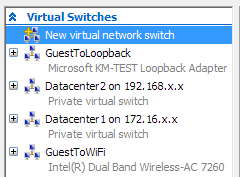
Create another new External Virtual Switch and name it GuestToWiFi, configuring it to the physical Wireless adapter that you have connected to Internet.
You should now have 4 Switches configured in your Hyper-V Virtual Switch Manager: 2 are private to simulate 2 datacenters, 1 is for host-to-vm and another for allowing the VMs to get Internet.
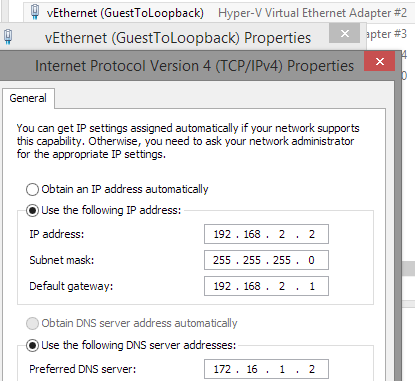
Finally, configure your virtual ethernet GuestToLoopback with the IP Address that allows us to communicate with the Software Router later (refer to IP Table in Part 0 above):
Part 2: Create the Parent virtual machine
Run this PowerShell to create the parent disk. Note that to improve performance, the Parent Disk should be on different physical disk than the Child Disk that we’ll create later. Here, the Parent Disk is created on C: It also helps to have 2 SSDs 🙂
|
1 2 3 4 5 |
# ZeddyLabs.com - CreateParentDisk.ps1 # Create a Parent Disk to be used for Differencing purposes later Import-Module Hyper-V New-VHD -Path "C:\VMs\WS2012R2-Parent.vhdx" -Dynamic -BlockSizeBytes 2MB -LogicalSectorSizeBytes 4096 -PhysicalSectorSizeBytes 4096 -SizeBytes 20GB New-VM -BootDevice CD -Generation 2 -MemoryStartupBytes 2GB -Name "Windows 2012 R2 Parent" -Path "C:\VMs\WS2012R2-Parent" -VHDPath "C:\VMs\WS2012R2-Parent.vhdx" |
Edit settings for VM “Windows 2012 R2 Parent” and load the .ISO of Windows Server 2012 R2 to the CD:

Now Start the VM “Windows 2012 R2 Parent” and install the OS.

Now that your VM “Windows 2012 R2 Parent” can connect to Internet, download these Essential Tools:
1. WinRAR
2. Microsoft Network Monitor
3. Microsoft Message Analyzer
4. SysInternals Suite
Run BGInfo from SysInternals, then modify the config like below:
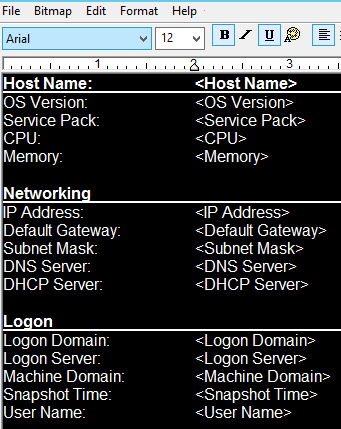
Save the BGInfo settings as “DefaultBGInfo.bgi” so you can load this on every Child Virtual Machine later on.
Part 3: SysPrep and Mark Parent Disk as Read-Only
When you want to join a virtual machine to the domain setup in Domain Controller, you need unique SIDs. This is why you have to SysPrep the Parent before creating the child disks.
Open up CMD as Administrator and run this command:
|
1 |
C:\Windows\System32\Sysprep\Sysprep.exe /generalize /shutdown /oobe |
Once the “Windows 2012 R2 Parent” virtual machine automatically shuts down, convert the dynamic VHDX disk to a fixed VHDX disk for better performance by running this PowerShell:
|
1 2 3 4 5 6 |
# ZeddyLabs.com - OptimizeParentDisk.ps1 # Convert VHDX to Fixed type and compacts it, ready for differencing Import-Module Hyper-V Optimize-VHD "C:\VMs\WS2012R2-Parent.vhdx" Convert-VHD -Path "C:\VMs\WS2012R2-Parent.vhdx" -DestinationPath "C:\VMs\WS2012R2-Parent-ReadOnly.vhdx" -VHDType Fixed Resize-VHD "C:\VMs\WS2012R2-Parent-ReadOnly.vhdx" -ToMinimumSize |
When the new fixed-size VHDX is created, go to C:\VMs\WS2012R2-Parent-ReadOnly.vhdx , right-click the file and make it Read-Only:
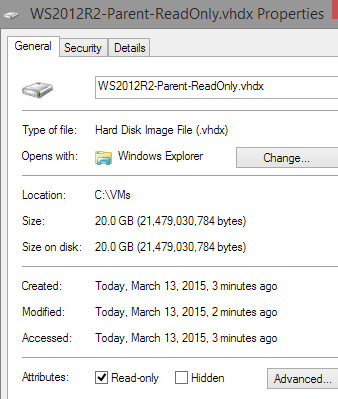
This will ensure that the Parent Disk cannot be modified and that changes will occur in the Child Disks later.
Part 4: Creating the Child Disks and child virtual machines
Simply run this PowerShell to create the child disks and virtual machines while you make coffee:
|
1 2 3 4 5 6 7 8 9 10 11 12 13 14 15 16 17 18 19 20 21 22 23 24 25 26 27 28 |
# ZeddyLabs.com - CreateChildDisks.ps1 # Creates Child Disks using the WS2012-R2-ParentDisk-ReadOnly as Parent # DC1 = Domain Controller 1 # SQL1 = SQL on Datacenter1 (Abu Dhabi) # SQL2 = SQL on Datacenter2 (Singapore # SP1 = SharePoint on Datacenter1 (Abu Dhabi) # SP2 = SharePoint on Datacenter2 (Singapore) # ROUTER1 = Router connecting Datacenter1 to Datacenter2 Import-Module Hyper-V New-VHD -ParentPath "C:\VMs\WS2012R2-Parent-ReadOnly.vhdx" -Path "D:\VMs\DC1\DC1.vhdx" -Differencing New-VM -BootDevice VHD -Generation 2 -MemoryStartupBytes 1.5GB -Name "DC1" -Path "D:\VMs\" -VHDPath "D:\VMs\DC1\DC1.vhdx" -SwitchName "Datacenter1 on 172.16.x.x" New-VHD -ParentPath "C:\VMs\WS2012R2-Parent-ReadOnly.vhdx" -Path "D:\VMs\ROUTER1\ROUTER1.vhdx" -Differencing New-VM -BootDevice VHD -Generation 2 -MemoryStartupBytes 1GB -Name "ROUTER1" -Path "D:\VMs\" -VHDPath "D:\VMs\ROUTER1\ROUTER1.vhdx" -SwitchName "Datacenter1 on 172.16.x.x" Add-VMNetworkAdapter -VMName "ROUTER1" -SwitchName "Datacenter2 on 192.168.x.x" Add-VMNetworkAdapter -VMName "ROUTER1" -SwitchName "GuestToLoopback" New-VHD -ParentPath "C:\VMs\WS2012R2-Parent-ReadOnly.vhdx" -Path "D:\VMs\SQL1\SQL1.vhdx" -Differencing New-VM -BootDevice VHD -Generation 2 -MemoryStartupBytes 2.5GB -Name "SQL1" -Path "D:\VMs\" -VHDPath "D:\VMs\SQL1\SQL1.vhdx" -SwitchName "Datacenter1 on 172.16.x.x" New-VHD -ParentPath "C:\VMs\WS2012R2-Parent-ReadOnly.vhdx" -Path "D:\VMs\SQL2\SQL2.vhdx" -Differencing New-VM -BootDevice VHD -Generation 2 -MemoryStartupBytes 2.5GB -Name "SQL2" -Path "D:\VMs\" -VHDPath "D:\VMs\SQL2\SQL2.vhdx" -SwitchName "Datacenter2 on 192.168.x.x" New-VHD -ParentPath "C:\VMs\WS2012R2-Parent-ReadOnly.vhdx" -Path "D:\VMs\SP1\SP1.vhdx" -Differencing New-VM -BootDevice VHD -Generation 2 -MemoryStartupBytes 6GB -Name "SP1" -Path "D:\VMs\" -VHDPath "D:\VMs\SP1\SP1.vhdx" -SwitchName "Datacenter1 on 172.16.x.x" New-VHD -ParentPath "C:\VMs\WS2012R2-Parent-ReadOnly.vhdx" -Path "D:\VMs\SP2\SP2.vhdx" -Differencing New-VM -BootDevice VHD -Generation 2 -MemoryStartupBytes 6GB -Name "SP2" -Path "D:\VMs\" -VHDPath "D:\VMs\SP2\SP2.vhdx" -SwitchName "Datacenter2 on 192.168.x.x" |
Part 5: Setting up ROUTER1 virtual machine
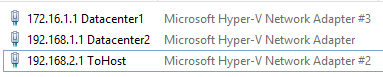
Start the ROUTER1 VM, go to the Network settings and configure the 3 virtual network adapters according to the IP Table in Part 0 above:
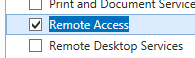
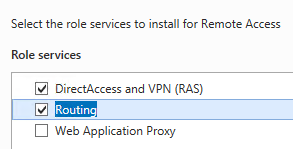
Then Add Role Remote Access
And add feature Routing
Next open Routing and Remote Access, right-click ROUTER1 and choose Configure and Enable Routing and Remote Access

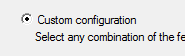
Choose Custom Configuration
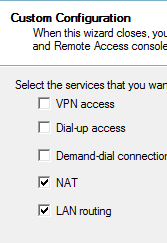
Select NAT and LAN Routing
Start the Service.
Now we need to configure NAT so that other virtual machines connected to this router have Internet access.
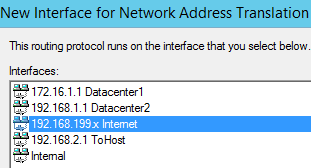
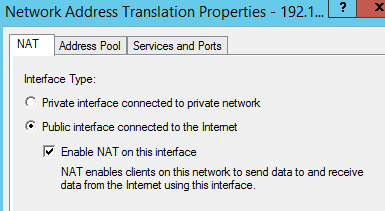
Right-click NAT and choose New Interface
![]()
Select the virtual ethernet that is connected to Internet (your WiFi or LAN cable).
Finally choose Public interface connected to the Internet and select Enable NAT on this interface.
Now you are done setting up the Router Software.
Part 5: Configure the Domain Controller DC1
With ROUTER1 VM still running, Start DC1 VM, then configure the static IP address according to IP Table in Part 0 above.
Rename the Computer Name to DC1 and restart VM.
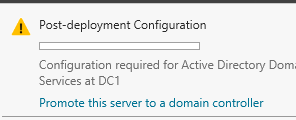
Add Role Active Directory Domain Services.
Promote this VM to Domain Controller status:
Add a new Forest ZED.com and click Next Next Next until server is promoted as DC.
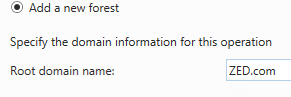
You now have a Domain Controller up and running!
Part 6: Configure SQL, SharePoint, other virtual machines
Keep ROUTER1 and DC1 virtual machines running, then login to other VM and configure their static IP Addresses according to IP Table in Part 0 above.
After configuring the IP, change the Computer Name and Join them to the new ZED.com domain:

Part 7: Browse IIS/SharePoint VM from Windows 8 Host
In order to do this, I need to turn off my WiFi. Just click your Wireless icon down there and select Wi-Fi Off.
Now open up CMD prompt and type “nslookup DC1.zed.com” , it should connect to your Loopback adapter which connects to ROUTER1 that connects you to DC1 virtual machine.
You should be able to open up your IE11 browser in Window 8 and browse http://intranet.zed.com for your SharePoint development now 🙂

Pingback: Presentation: SharePoint Warm Disaster Recovery with SQL AlwaysOn | ZeddyLabs – Zeddy Iskandar | Blog in English
Pingback: How to fix Windows Server 2012 Blue Screen SYSTEM_THREAD_EXCEPTION_NOT_HANDLED (WppRecorder.sys) | ZeddyLabs – Zeddy Iskandar | Blog in English
Pingback: The Ultimate Laptop for Devs, ITPros, Creatives – 2016 Edition | ZeddyLabs – Zeddy Iskandar | Blog in English